Showing posts with label cartoons. Show all posts

Sunday, April 29, 2012


Jen's Pug

I think this is the first real toy I designed and sculpted! I wanted to give my GF at the time a birthday present and she owned this little pug named Mushu, who had a slight nerve problem that caused his tongue to hang out constantly. It was pretty cute. So I made a toy of him for her!


I thought it would be fun to make a little pug that when you wiggled his tail, the tongue would move across his mouth.  I thought it would be pretty easy to hide a simple lever mechanism inside his body.


I started by sculpting the whole piece as I normally would. The tail I did as a separate piece because it had to move.  I also dug a slot where the mechanism for the moving tail.


Then I cut him in half and baked in the oven! Boo-hoo-ha-haha!


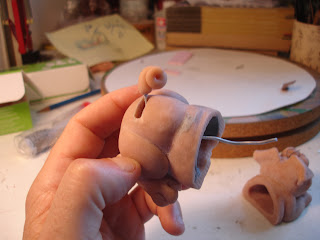
After the pieces were baked and cooled, I took my Dremel tool and carefully hollowed out the inside of the both body pieces. I drilled a small hole in the front of the mouth as a guide so I didn't drill out the mouth too far.


I took an eye hook and screwed it into the top of the back piece. I put some epoxy putty around it to make sure it wouldn't come out after I put the halves back together!  The wire that will eventually connect the tail and the tongue was run down the back slot through the eye hook and finally out through the mouth.


I pre-painted the mouth black since I didn't want to paint it with the tongue in place.


The tongue I made with 2 felt pieces sandwiched over a thin metal loop.  This way, with the wire inside, the tongue could be posable.


The tongue wire was attached with more epoxy putty.


I put a "diaper" around the felt so it would stay clean... cuz I'm a slob.


With the mechanism in place, I joined the two halves together using epoxy putty and sanded it smooth when dry.


All primed for paint!


And finished! Turned out pretty cool. Check out the video so you can see him slurp!


I put little felt paw pads on the bottom and signed it for Jen. She really dug her pug!

Jen with her Mushu II !

Mushu with Mushu II !


MUSHU PUG TOY VIDEO


UP NEXT...
...Why so serious...?

Sunday, December 5, 2010

MaquetteProject- entry 11


Hey everyone! Hope you had a great Thanksgiving like I did! Sorry I haven't updated earlier but I got carried away with other projects and work and family stuff and you know...

I baked the upper portion of the tall guy and after showing Erick about some edits, I started finalizing the bottom half of his body and his tiny legs.


The legs should be able to hold his weight with the help of the armature wires in them, after they are baked that is...


Also finished his vest, along with his pants and belt.


I did some finishing touches on his face and hair since I had another baking session. His freckles I plan on etching into the baked sculpting with a needle tool. They are so subtle and I just feel like if I tried sculpting them into the soft material I would just end up thinking they were too heavy anyway and filling them in and trying again...!


...almost done!

VIDEO ENTRY 11-A


VIDEO ENTRY 11-B

...Later!

Saturday, October 16, 2010

MaquetteProject- entry 10


Hey y'all...! Building up the taller guy and roughing out his details this time around.


As before, I used simple shapes to start out with and keep refining them until they look like the sketch. I kept comparing everything to the sketch to keep the scale and size relations right.


This guy looks like he's really heavy, but remember his torso is full of tinfoil, so he' not really heavy. I had to keep him light because of his skinny legs!


DROP AND GIMME TWENTY!!


Hooks for hands... patience... they'll come around...


Gettin' there... still pretty rough but you can tell it'll look like him. Man, his jaw is big!


I roughed in the hands and put a temporary sign in them to see if I was on the right track. You kind of have to keep everything in mind while you are sculpting a project like this with added props. The hands may look really good, but will they hold the sign after you bake the thing?


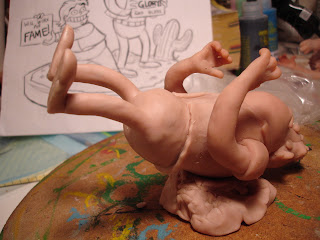
You may have noticed that the legs were roughed in and now they are not! This is because in the process of sculpting him, I kept squishing the legs out of proportion, so I decided to bake the top half first and them sculpt the lower half after, just like I did with the shorter character.


VIDEO ENTRY 10

See you next time! Almost done!